


How to Set Up a Turntable
This simple guide can help you get great sound and longer life out of your record player and LPs
When you shop through retailer links on our site, we may earn affiliate commissions. 100% of the fees we collect are used to support our nonprofit mission. Learn more.

I’d had my trusty AR ES-1 turntable for many years when a house fire reduced it, and about 3,000 records, to smokey rubble more than a decade ago. The silver lining to this story is that when I replaced the turntable, I was catapulted back into the world of vinyl just as these analog relics were reliving a resurgence.
By then I’d also amassed a pretty substantial CD and Blu-ray collection and would only selectively be replacing some of my records. So I didn’t want to spend a fortune on a new turntable and cartridge.
I found quite a robust market for affordable record players that could still deliver the tangible warmth and excitement of vinyl, even for those on a budget. So while I do occasionally fantasize about owning one of those eye-catching, price-is-no-object models—yes, VPI Avenger Reference, I’m talking about you—I’m actually quite content with the more modest ProJect Debut III turntable I purchased several years back for less than $400, including a decent cartridge.
One thing I didn’t count on, however: I didn’t quite remember how to properly set up a new turntable.
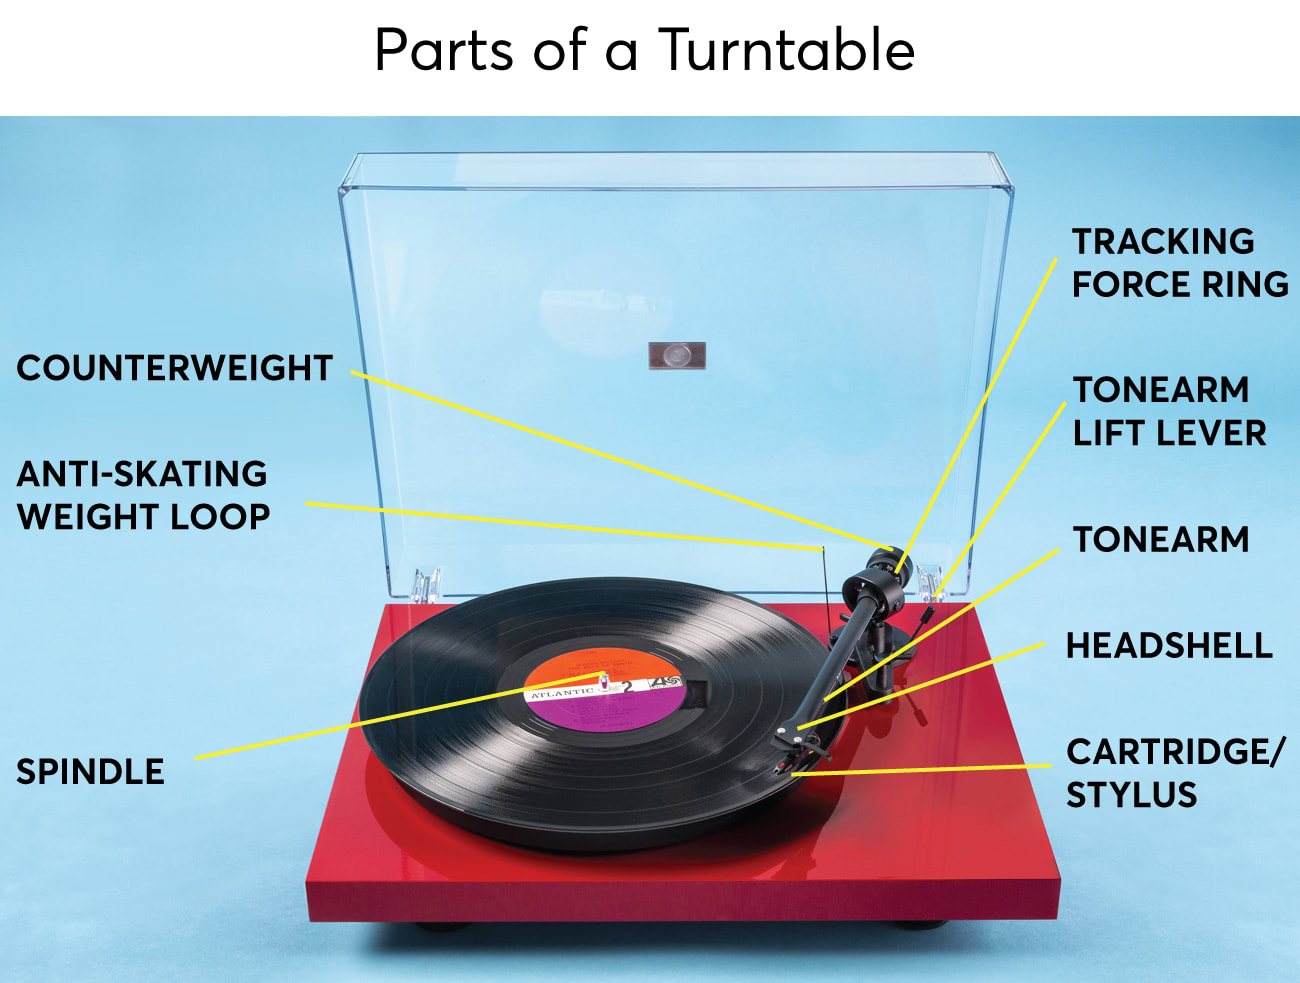
Setting up a turntable involves lots of fiddling. These labels wil help as you follow the instructions below.
If you want more detailed instructions, along with video clips of each step, Fremer has a DVD that I highly recommend, especially if you’re investing in a high-end turntable. You can also find hobbyist YouTube videos, and many turntable and cartridge manufacturer websites also provide a decent amount of free setup information for their specific models.
The good news is that you don’t have to spend much on setup gear. I laid out less than $40 for a few turntable-specific items I didn’t already own. The biggest investment will be your time. And once you’ve got everything in order, you won’t have to do much again until it’s time to change the cartridge.
1. Make Sure the Turntable Is Level
Start off by selecting a good location for the turntable, preferably a spot where you can access it easily, but away from inadvertent bumps and on a surface that’s relatively free from vibrations, such as from kids jumping around or powerful subwoofer on wood floors. You can also buy anti-vibration pads and feet to help isolate the turntable.
It’s vital to make sure the turntable is level. If it’s not the sound can suffer, and you’ll cause premature wear on your records. I used a couple of basic bubble levels from my workbench, but you can also buy a dedicated turntable level, which has a circular, 360-degree design and sits on top of the spindle. These typically cost $25 to $30 and can show whether the turntable is level in all directions at once.
Start by getting whatever surface the turntable will be resting on—a table, rack, or media console—as level as possible first, using shims under the legs if needed. Many turntables have adjustable feet that can be raised and lowered, but they may not be able to compensate enough if the furniture you’re using is on an angle.

Photo: John Walsh/Consumer Reports Photo: John Walsh/Consumer Reports
Then place a bubble level on top of the turntable platter, first in a front/back direction, then with the level oriented side-to-side, making adjustments until the bubble is centered in both directions. (You can use two bubble levels at once, oriented in different directions, as we show in the photo above.) If the turntable doesn’t have adjustable feet, you may need to place shims under them.
Once I think the turntable is level, I’ll usually also place the level at a diagonal just to make sure.
2. Install the Cartridge
These days, many inexpensive turntables come with the cartridge installed. If yours doesn’t, or if you’ve decided to replace the cartridge, you’ll need to install it before you can make any adjustments.
You should have a few tools handy, including a small flathead screwdriver, a pair of needle-nosed pliers, and a toothpick that can get into areas your finger can’t. A set of small Allen keys, along with a set of small sockets, may also be useful. Make sure the room is well lit, or grab an adjustable table lamp or headlamp.
The cartridge, which holds the stylus (aka the needle), attaches to the headshell at the front end of the tonearm. Cartridges come with a stylus guard installed to protect the needle; leave it on for now.
Most tonearms have a standard half-inch mount, with two (or sometimes three) small screws or bolts to secure the cartridge to the headshell. Use a very small flathead screwdriver to mount the cartridge, as in the photo below. If your model has nuts and bolts instead, you’ll need a tiny socket or needle-nosed pliers to hold the nut while tightening the bolt. In either case, tighten the fasteners just enough so the cartridge is snug and doesn’t move. Don’t overtighten it.

Photo: John Walsh/Consumer Reports Photo: John Walsh/Consumer Reports
Once the cartridge is in place, you’ll need to attach the cartridge wires. This is perhaps the trickiest part of the setup due to the small size and fragility of the leads and connectors.
Many turntables—mine included—have color-coded posts. They may be marked with tiny R, L, plus, and minus signs near the posts. If your cartridge posts aren’t color-coded, they should adhere to this universal color-coding system: red for right positive, green for right negative, white for left positive, and blue for left negative.
Go slowly, attaching the color-coded wire leads from the tonearm to the corresponding pins on the cartridge. Be careful with these wires; applying too much pressure can break them.
I’ve seen videos where people use needle-nose pliers to push the connectors onto the pins, but my preference is to use my fingers. If you can’t get a decent grip, I recommend trying tweezers before pliers, because I find it easier to control the amount of pressure. You can loosen up terminals that are a bit too tight with a toothpick, using very light pressure.
3. Set the Tracking Force
Now you’re ready to really start making adjustments. Begin by setting the vertical tracking force (VTF), which is sometimes called the cartridge downforce adjustment. It’s how hard the stylus will press down in the record groove. Too little force and the record will skip (or the sound will distort), while too much pressure will cause your stylus to wear out prematurely. Refer to the turntable or cartridge manual for the proper tracking force range for your cartridge.
Some turntables, including mine, provide a suggested tracking force range in milliNewtons, or mN; others use grams. One gram is roughly equal to 10mN.
With many turntables, you can adjust the VTF by simply turning a piece called the counterweight at the back of the tonearm to the recommended number. Other turntables, mine included, also have a tracking force ring or downforce scale you’ll need to adjust as well. (Both are labeled in the photo at the top of the page.)
To get better accuracy, you can also measure the pressure the needle is applying while you make the adjustments, using a tracking force gauge. Some manufacturers include a basic manual gauge with their turntables, but you can buy a manual or digital gauge for $20 to $30.
Photo: John Walsh/Consumer Reports Photo: John Walsh/Consumer Reports
Start by removing the stylus guard by sliding it straight forward from the front of the cartridge. Then release the tonearm from the locking clamp, and lower it using the cueing lever at the right rear of the tonearm while gently holding the tonearm headshell. You’ll need to “float” the tonearm by moving the whole counterweight at the rear of the arm until the arm and cartridge remain suspended horizontally right above the platter, so that it’s not moving either up or down.
Some models have the counterweight installed, while others require you to install it yourself, making sure the numbers on the ring face forward toward you. Once the arm is floated, return it to its rest.
Then, if your turntable has a tracking force ring, turn it to zero, lining it up with a small line at the top of the tonearm. You then adjust the tracking weight by rotating the counterweight, along with the tracking force ring if you have one, counterclockwise until you hit the recommended setting.
For my setup, I bought an inexpensive ($20) digital tracking force gauge to set the VTF, as you can see in the photo above. You just place the gauge on the surface of the platter (without a record on it), and then rotate the counterweight until the gauge reads the proper tracking force. I was able to hit my turntable’s recommended tracking force of 17.5mN exactly. Many turntables provide a VTF range rather than a single number.
4. Align the Cartridge
Properly aligning the cartridge and stylus can help ensure you get the best sound and reduce wear on your records. (This step is also called setting the overhang.) Many turntables, including mine, come with an alignment protractor, also called an alignment gauge. As you can see in the photo below, the protractor is a rectangular strip—often made of cardboard or paper, but sometimes plastic—that’s placed over the spindle, with small circular target points for the needle, plus a series of grid lines that should align with the cartridge. This tool can help ensure that your stylus and cartridge are positioned properly relative to the record’s grooves.
If your turntable doesn’t come with an alignment protractor or you’ve misplaced it, there are numerous online versions you can print. First, see if you can get one from the turntable manufacturer’s website; if not, you can download one free from vinylengine.com, which is a great all-around resource for turntables and vinyl information.
There are two popular alignment systems—Baerwald and Stevenson—with protractors that will work with many models. You can see if your cartridge manufacturer recommends one or the other, or you could try both and see if one is better. (If you print out an online protractor, make sure the printer is set to print at 100 percent.) Cut out the protractor, plus the hole for the turntable spindle, following the template’s dotted lines. Then place the protractor over the spindle.
The goal is to get the tip of your stylus to rest on the target point on the alignment gauge, with the body of the cartridge parallel to the grid lines on the gauge. If your gauge is thin, like a piece of paper, put an LP record on your turntable. Some gauges are made to be the thickness of a record, letting you skip that step.

Photo: John Walsh/Consumer Reports Photo: John Walsh/Consumer Reports
Many protractors have two alignment points surrounded by the grid lines. Start by checking the outer point first, making sure that the cartridge body also aligns with the grid lines on the protractor. Then move to the second, inner point to check that the cartridge and stylus align there as well. Often you’ll find that if the first point lines up, the second one will, too.
If it does, you can move on to the next step. If not, you’ll need to loosen the cartridge screws on the top of the headshell and move the cartridge a bit until the stylus is able to hit (or get very close to) both points on the alignment tool, with the cartridge parallel to the grid lines. Now firmly (but gently) retighten the cartridge screws, making sure the cartridge doesn’t move during the process.
Don’t overtighten, because that can damage the headshell or cartridge. Getting things perfect can take some trial and error. Turntable guru Fremer suggests rechecking the vertical tracking force after completing this step.
5. Set the Anti-Skating Force
When a record is spinning, the stylus is pulled toward the center of the record. That can make it press unevenly, applying more force to the inside half of the groove. To keep that from happening, the tonearm uses anti-skating, which applies a counterforce.
On some tonearms, this can’t be adjusted. Other turntables, including mine, use a relatively simple string-and weight system, which loops around a grooved prong on the rear of the tonearm. (I’m in the process of replacing my turntable’s anti-skating device, so it isn’t shown in the photos you see.) Some turntables have a dial or a slider to adjust the anti-skating force. As with the vertical tracking force, you should set the anti-skating force to the manufacturer’s recommendations.
The anti-skating force is often set to match the vertical tracking force, so if the VTF is 2 grams, you set the anti-skating force to 2 grams as well. Some test records (which are discussed in Step 7, below) include an anti-skating test tone that lets you verify this adjustment by ear.
If this is done properly, the stylus will stay in the record’s grooves without exerting too much force. If the anti-skating is set improperly, you may hear an improper balance between the left and right channels—and also end up increasing the wear on your records.
6. Adjust the Vertical Tracking Angle
When records are manufactured, the grooves are cut at an angle, with the idea that they’ll be played back by a stylus that’s also set at a certain angle. This is the vertical tracking angle (VTA). It’s simply the front/back tilt of the cartridge cantilever (the angled shaft attached to the stylus) relative to the record. You should check your turntable’s manual or the manufacturer’s website for specific information, but the standard VTA is 20 degrees, plus or minus 5 degrees.
The goal is to have the cartridge stylus perpendicular to the record groove, while the tonearm is parallel to the surface of the record. (See the photo below.) Because the cartridge VTA is set by the manufacturer, you’ll have to raise or lower the tonearm at the pivot point at the rear of the tonearm to achieve the proper angle.
Photo: John Walsh/Consumer Reports Photo: John Walsh/Consumer Reports
Not all tonearms have this adjustment—mine doesn’t. For those that do, there’s usually a set screw that lets you raise and lower the back of the tonearm. If the top of the tonearm doesn’t sit parallel to the surface of the record, loosen the set screw, raise or lower the back of the arm to level it, then retighten the set screw.
Practiced turntable enthusiasts can fine-tune the VTA by listening to a familiar album. Lower the VTA by lowering the tonearm, and you’ll generally hear the bass become more pronounced, while raising the tonearm will generally increase treble. You can play around with the VTA until you find a balance that’s pleasing to you.
7. Set the Azimuth
Azimuth is a fancy name for the left/right tilt of the cartridge body, and it can affect the left/right channel balance of the signal. Often, the stylus isn’t mounted exactly perpendicular to the arm, so you’ll need to adjust it. Most models that let you adjust the azimuth, including mine, have a set screw at the bearing (back) end of the tonearm. It can be a bit tricky to find on some turntables, so refer to your manual to find its exact location.
Tilt the tonearm up, and loosen the screw just enough to let the tonearm rotate. You can adjust azimuth simply by eyeballing it with the tonearm resting on a record; I recommend using a magnifying glass. Squat down so you’re looking directly at the face of the cartridge and see if the stylus is straight up and down. If it’s not, take the tonearm off the record and adjust it until the stylus is vertical in the groove. You can then retighten the screw.

Photo: John Walsh/Consumer Reports Photo: John Walsh/Consumer Reports
There are other options to make this easier. I used an inexpensive azimuth adjustment gauge, which has horizontal lines that indicate if your headshell and cartridge are properly aligned. Once again, you should also check to make sure the stylus is perpendicular to the groove; sometimes the cartridge and stylus are slightly out of alignment. (It’s more important that the stylus is perpendicular than that the cartridge is perfectly aligned.)
More sophisticated phono enthusiasts sometimes use a test disc with test tones and an audio analyzer to measure the left/right tonal balance of the stereo signal. There are also expensive azimuth analyzers, but they can approach or exceed the cost of less-expensive turntables.
Recheck the Tracking Force
Once you have completed all these steps, it’s a good idea to recheck the tracking force one more time and adjust it if needed.
Otherwise, you should be set to enjoy your turntable and records for years to come—or at least until you need to replace the cartridge and stylus.
Great Headphones Picks
Got your turntable set up and ready to play some music? These three home/studio-style models offer very satisfying sound at prices that won’t break the bank.
